How To Setup Print Ready Files
Ensure your designs print exactly as intended with our professional guidelines
Design Excellence: Your Path to Perfect Prints
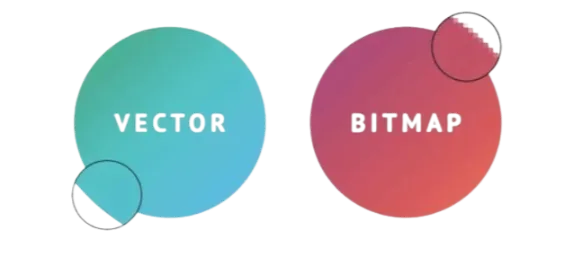
Unlock exceptional print quality by submitting your artwork as vector files. Unlike pixel-based images, vector designs use mathematical equations to define shapes and lines, delivering flawless results across our entire range of services—from vibrant DTF transfers to precision DTG printing and eye-catching promotional products.
Vector designs are infinitely scalable—a game-changer for your brand. Created in professional design software (Illustrator, CorelDRAW), these files maintain perfect clarity whether printed on a business card or blown up for a banner display, with no loss of definition or sharpness.
Your brand deserves impeccable representation. Vector formats preserve every detail of your design, ensuring consistent quality across all your promotional items. From custom apparel to corporate merchandise, the mathematical precision of vector graphics guarantees your brand identity remains crisp, clean, and professional at any size.
Struggling with vector creation? Don’t worry—Ink Bomb’s in-house design experts are ready to transform your ideas into print-perfect vector files. Let us help optimize your artwork for the best possible results across any medium. Contact our design team to discuss your project needs.

Is My File Print Ready?
Professional printing requires one of two file types to ensure the highest quality results:
Vector Files
The gold standard for print production. Vector files are created using mathematical formulas rather than pixels. This means your design stays crystal clear at any size, from business cards to banners. Common vector formats include .EPS, .AI, and some .PDFs. These files are best for logos, text, and clean designs that need to scale for different products.
High-Resolution Images
If you’re working with photographs or complex designs, your file needs to be at least 300 pixels per inch, though 600 DPI is preferred for optimal quality. With images, typically saved as JPEG, won’t deliver the crisp results you want. Here’s why: When you enlarge a low-resolution image, you’re stretching the same number of pixels over a larger area or duplicated pixels.
For example, imagine placing a small logo on the left chest of a shirt. A web-quality image (72 DPI) that looks perfect on your screen would need to be over three times its original size to meet our minimum print requirements (300 DPI). This stretching causes pixelation and your print quality suffers.

Converting Fonts to Outlines
When creating artwork that includes text, converting fonts to outlines is a crucial step. Here’s why: If we don’t have the exact fonts used in your design installed on our system, the text appearance will change when we open your file.
This is because missing your specific fonts means our software substitutes with alternative fonts that may look completely different.
Pro Tip:
Keep two versions of your file – an editable copy with live text, and a print-ready version with outlined text. This way, you can make future text edits using your master file while having a perfect version for printing.
1Open your document in Adobe Illustrator
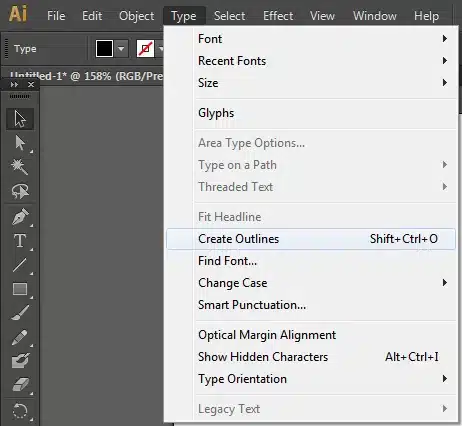
2Select your text and choose Type > Create Outlines
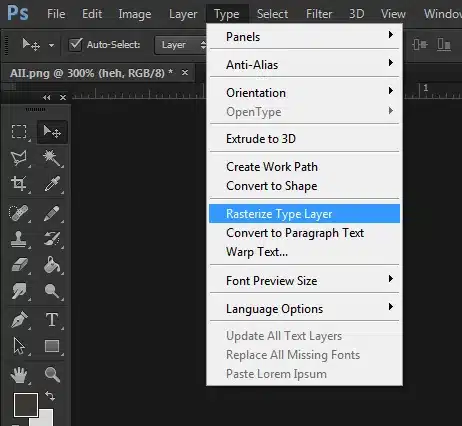
3In Adobe Photoshop: Select your text layer and choose Layer > Rasterize > Type
(Note: This converts text to pixels rather than vector shapes)
Print to Size: Creating Your Design at the Right Scale
One of the most critical yet often overlooked aspects of preparing artwork for printing is sizing your design correctly from the start. Every file you submit should be created at the exact dimensions you want it printed – this isn’t just a preference, it’s essential for quality.
When working with raster images (like photographs or detailed designs), enlarging them beyond their original size can severely compromise quality. Think of it like stretching a rubber band – the further you stretch it, the thinner and weaker it becomes. Similarly, when you enlarge a raster file, the image becomes blurry and pixelated as the same amount of image data is forced to cover a larger area.
For example, if your original design is 3″x 3″ but you need a printed at 12″ x 12″, simply scaling up the file won’t result in a sharp, print-quality image. The only exception to this rule is vector files, which can be scaled to any size while maintaining perfect clarity.
To ensure the best possible print quality, always create your artwork at the final print size you need. This attention to detail at the design stage will guarantee crisp, professional results in your finished product.
Ready to Get Started with Your Print Project?
Our team is here to ensure your design translates perfectly to print


